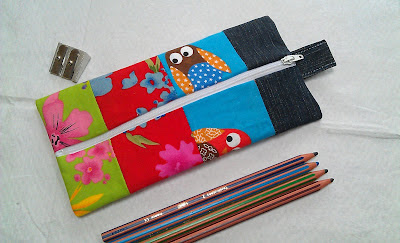
I saw this type of patchwork pencil case on A Spoonful of Sugar's blog and in issue 21 of Making Magazine. They're so pretty and a great way to use up fabric scraps. This is my version. Isn't the owl fabric cute? The denim has been recycled from a pair of old jeans.
Friday, 6 July 2012
Sunday, 1 July 2012
Crochet Flower Headband
I made this headband for my niece. It was really simple and looked very pretty on. Unfortunately I didn't have a chance to take a picture so you'll just have to take my word for it ;-)
This is my first attempt at writing a pattern/tutorial! I hope it's correct.
Edit: Use whatever yarn/hook combination you like. The pictured headband was made using Rico Creative Cotton Aran and a 5mm hook.
Ch - chain
Dc - double crochet (US single crochet)
Tr - treble crochet (US double crochet)
Htr - half treble crochet (US half double crochet
Dtr - double treble crochet (US treble crochet)
Sl st - slip stitch
The headband is made in rows widthways instead of in a round, so:
1. ch 7, tr into 4th chain from hook, tr in the remaining 3 st. Turn.
2. *Ch 2. tr in next 4 st.*
3. Repeat from * until the desired length has been achieved. The headband will stretch slightly so make it a good 1 inch / 2.5cm smaller than the head measurement. (For my 3 yr old niece I made 42 rows. Edit: that was actually way too big once it had stretched. 38 rows or so would have been enough. I just made one for myself and did 44 rows. It's quite a snug fit but I've recently discovered that I have a freakishly large head! But that's another story.)
4. Join the two ends: *ch 1, sl st through bottom loop of 1 tr and top loop of adjoining tr*. Repeat * another 4 times. Fasten off.
For a wider or narrower headband increase or decrease the number of foundation chains.
To make the flower:
1. (Leave a long tail and use that to attach the flower to the headband.) Ch 4. Sl st into 1st ch to form a ring.
2. 12 dc into ring. Sl st into 1st dc.
3. Ch 2 (counts as 1 htr). Htr in next st, ch 3, *htr in next 2 st, ch 3* 5 times. Sl st into 2nd ch of ch 2.
4. Ch 1. *Dc, htr, tr, dtr, ch 1, dtr, tr,htr,dc into next ch 3 space* 5 times. Dc, htr, tr, dtr, ch 1, dtr, tr,htr into next ch 3 sp. Sl st into ch 1 to complete round. Fasten off.
If you like, embellish the flower with a pretty button in the centre, or make the flower in a contrasting colour to the headband, or make more than one flower and layer them, offsetting the petals.
Sew the flower to the headband and sew in any loose ends. Et voila! :-)
Monday, 11 June 2012
Colour Inspiration - Picture Postcard Summer's Day
Have you ever looked up at some trees on a summery day and thought how pretty the green leaves looked against the lovely sky blue and cotton wool clouds? Or just how perfect the typical view of the English countryside, with its rolling green hills occasionally interrupted by a sea of yellow oil seed rape, looks in the summer?
So I thought that those colours would work perfectly together in a crochet or fabric project. As it happens I have those very colours sitting in my yarn stash. Don't they look great together?
The only thing missing is a project to use them in. I can't think what to make! Any suggestions?
So I thought that those colours would work perfectly together in a crochet or fabric project. As it happens I have those very colours sitting in my yarn stash. Don't they look great together?
The only thing missing is a project to use them in. I can't think what to make! Any suggestions?
Sunday, 27 May 2012
Pretty Things - Floral Displays
I was at a wedding yesterday and there were a couple of really pretty flower displays. I especially liked the first one because it was slightly fragrant as well.
Tuesday, 22 May 2012
Colouring In
It appealed to me immediately, and not just because of the price! I thought it was crying out to be coloured in, and what better way than with embroidery? And then a couple of days ago I saw this:
and instantly imagined how amazing it would look with all the segments filled in with an array of beautiful, bold colours. Don't you think so?
So that's the idea anyway. You'll have to wait and see if I manage to make it happen :)
Thursday, 3 May 2012
Granny A Day - Week 18
Well I think it's fair to say that I've failed miserably at the Granny A Day challenge! I'm still producing the occasional square but by no means keeping up with one a day. The baby blanket enlargement project goes on, I've made a few patriotic squares inspired by my red, white and blue baby scarf (one of which is now a lovely pincushion) and a headband, which started off as a present but that I've ended up keeping for myself. But I think that the challenge has done what I hoped and stimulated my creative juices. I'm definitely making more than I ever have and still have lots of ideas that I hope will keep me busy for a while.
Sent from my HTC
Labels:
Granny Square,
Granny-A-Day,
pincushion,
red white and blue
Friday, 20 April 2012
Ollie the Octopus
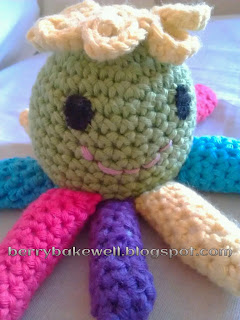
Since taking up sewing again and crochet I always say that I'll make gifts for friends and family but somehow never do. It was my husband's niece's birthday a couple of months ago. I started on a poncho for her that got put aside after the design started to go awry and it looked like it would be another gift that never made it out of my head. Then I started looking through my old magazines and I found a supplement called "Creative Crochet" that came with an issue of Making Magazine, which had a pattern for a cute little octopus. Perfect!
I made the tentacles multi-coloured and gave it a yellow mop of hair instead of a hat, and Ollie was born.
And I'm happy to report that Ollie is no longer in my possession. Gift gifted!
Sent from my HTC
I made the tentacles multi-coloured and gave it a yellow mop of hair instead of a hat, and Ollie was born.
And I'm happy to report that Ollie is no longer in my possession. Gift gifted!
Sent from my HTC
Monday, 16 April 2012
Pretty Things - Embroidered Piano Stool
While we were on holiday in the New Forest I saw this needlework piano stool in a coffee shop.
Sent from my HTC
Sent from my HTC
Thursday, 5 April 2012
Thrify Thursday - Craft Books
Every now and again when I pass a charity shop, I like to pop in and see what craft books they have on offer. So far I've spent about £10 on books and patterns, never spending more than £1 on a single item. My latest find is "The Colour Library Book of Creative Needlecrafts".
It's an absolute treasure trove of techniques, stitches and designs covering Knitting, Crochet, Embroidery, Patchwork, Applique and Quilting, and all for only 50p!!!
I was especially interested in the Crochet and Embroidery sections, and those alone would have been worth the original price of £15.95.
While the clothes patterns are a very dated (it was published in 1987), the home projects and motifs are still relevant or could easily be adapted to be made more up-to-date.
There's enough in here to keep me busy for years!

It's an absolute treasure trove of techniques, stitches and designs covering Knitting, Crochet, Embroidery, Patchwork, Applique and Quilting, and all for only 50p!!!
I was especially interested in the Crochet and Embroidery sections, and those alone would have been worth the original price of £15.95.
While the clothes patterns are a very dated (it was published in 1987), the home projects and motifs are still relevant or could easily be adapted to be made more up-to-date.
There's enough in here to keep me busy for years!
Monday, 19 March 2012
Fairy Tales and Dressing Up
So the weekend was dedicated to making a model of Jack and the Beanstalk. The cardboard tube from the middle of a roll of wrapping paper would serve as the beanstalk, with leaves cut out from green card and Jack made from a toilet roll tube with a tissue paper head. It turned out beautifully (forgive the poor photo), and apart from some help with cutting and sticking, it was mostly done by 4yo himself. I especially like the look on Jack's face. He won first prize don't you know :-D
The Welsh dress turned out to be more tricky than I expected. All the shops were full of cute little outfits for girls, with the only option for boys seeming to be rugby shirts. Apparently there is no such thing as traditional Welsh dress for men, so I ended up buying a rugby shirt. I also decided to make a red waistcoat with a crocheted leek brooch as a second outfit because I knew that there was no way said rugby shirt would stay clean for two days, but I only got as far as cutting the waistcoast pieces and making the base of the leek! Oh well, never mind. Perhaps I'll get them finished in time for next year...
Part of the reason that I didn't make the waistcoat was because I also decided to make a costume for my son to wear for the school's celebaration of World Book Day. We decided on Captain Barnacles from the Octonauts. Now, I have dabbled in dressmaking, but I'm no seamstress and despite not having a pattern I somehow convinced myself that it would be a quick job to whip up some bottoms using a really great quick method that I found in this tutorial, and a short-cut top by tracing around an existing long-sleeved t-shirt, but it didn't quite turn out that way! In the end not only did I make the top with separate sleeves, I also added a zip to the front and a collar. All without a pattern! I came dangerously close to staying up all night, but managed to get at least a little sleep after I decided to ditch the hat and to make the compass and badge out of card and not fabric. Here's what I was aiming for:
And this is the result:
It isn't perfect - some of the raw edges aren't finished, I forgot to iron a few of the seams, and the collar could have been fitted better to hide the top of the zip. In fact you'd be forgiven for wondering what all the fuss was about. But to me it's great achievement and I'm really pleased with how it turned out. My son on the other hand was much less impressed and sulked for the entire morning after I presented him with the outfit, refusing to wear it. In hindsight the leggings were probably a little snug, and jersey was probably not the most suitable material for the weather but I was gutted that he didn't like it. As a compromise he went to school in jogging bottoms and wore the top.
Despite the challenges, I really enjoyed the process. I'm so pleased that I was able to create a pattern (of sorts) and construct a garment. But if you ever hear me say "I'll make something quickly. It'll be a piece of cake..." again, slap me! Hard!
Subscribe to:
Posts (Atom)